How To Install Vcenter Server Appliance 6.5
VMware has announced the VMware vSphere 6.5 at the end of last year. vSphere 6.5 includes some of new features & new improvements compared to current version of vSphere 6. With launch of vSphere 6.5 VMware also announced the newer version of vCenter Server Appliance 6.5. vCenter Server Appliance 6.5 provides simplified & user friendly installation as compared to the earlier versions. Just like before now the installer does not require any plugin to Install & deploy the Appliance. Now you can directly install the appliance without any plugin directly.
vCenter Server Appliance 6.5 now includes the Upgrade, Migrate & Restore option from installer itself. You have to download the vCenter Server Appliance ISO from VMware website which is around 3.6GB in size.
Check below link to know about the system requirements for deploying VCSA 6.5:
VCSA 6.5 System Requirements
In this post we will see on how to install vCenter Server Appliance 6.5 step by step:
Step 1:
Mount the ISO & navigate to following path.
ISO > vcsa-ui-installer > win32
Run the Installer file to start the vCenter Server Appliance 6.5 Installer.

Step 2:
Installer wizard will start here.
Choose the first option Install to proceed with installation.

Step 3:
VCSA 6.5 Installer consists of 2 stage Installation & Deployment procedure.
First we will be Deploying the Appliance in Stage 1.
Click Next to proceed.

Step 4:
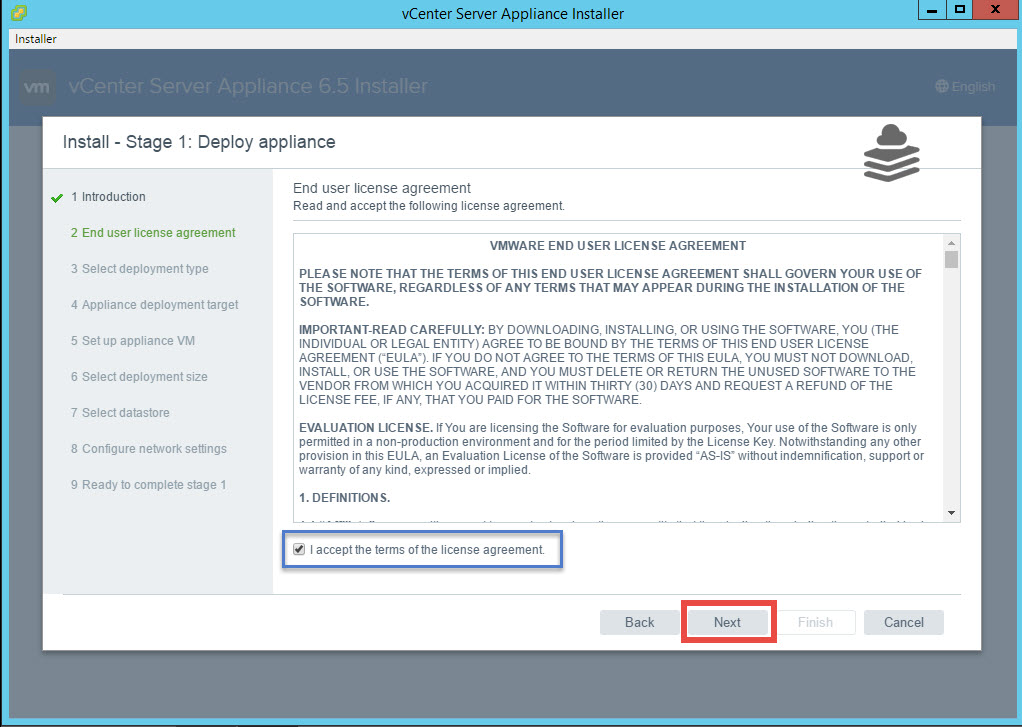
Accept the License agreement & click Next to proceed.


Step 5:
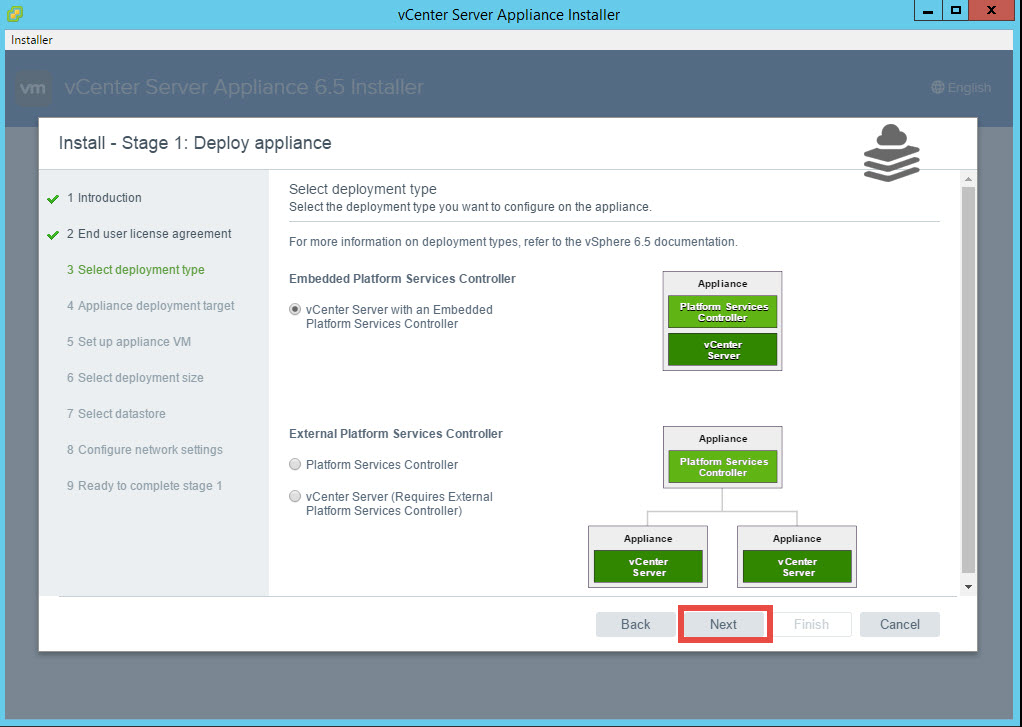
Select the deployment type here.
You can either go for the default which is vCenter Server with Embedded Paltform Service Controller or you can install vCenter Server & Platform service controller separately.
Choose according to your requirement.
We are going with the default vCenter Server with Platform service controller.
Click Next to proceed.

Step 6:
Provide the target ESXi host on which you want to deploy the appliance.
You can use ESXi host or you can also provide the vCenter Server Instance.
Click Next to proceed.

I have provided the ESXi host to deploy the appliance after clicking Next it will verify the credentials & you will get the Certificate Warning.
Click Yes to accept & continue.

Step 7:
Set the VM name & root password for the vCenter Server 6.5 Appliance.
Click Next to continue.

Step 8:
Select the deployment size.
You have multiple deployment sizes available. Choose the appropriate deployment size & storage according to your current environment.
Click Next to proceed.

Step 9:
Select the storage location for vCenter Server Appliance 6.5.
You can also Enable Thin Disk mode by checking the checkbox.
Click Next to proceed.

Step 10:
Configure Network Settings for the vCenter Server Appliance 6.5.
Click Next to proceed.

Step 11:
Now we are ready to start the deployment.
Check & verify all the configurations.
Click Finish to start the deployment.

After clicking Finish you will see that the Deployment has begun now. It will take around 25-30 Minutes for successful deployment.
After successful deployment you will get below screen.

As of Now we have successfully completed the Stage 1 of vCenter Server Appliance 6.5 installation.
Click Continue to proceed with the Stage 2 of the deployment.
Stage 2 Process:
Step 12:
We have completed the stage 1 now to proceed with stage 2 click Next.

Step 13:
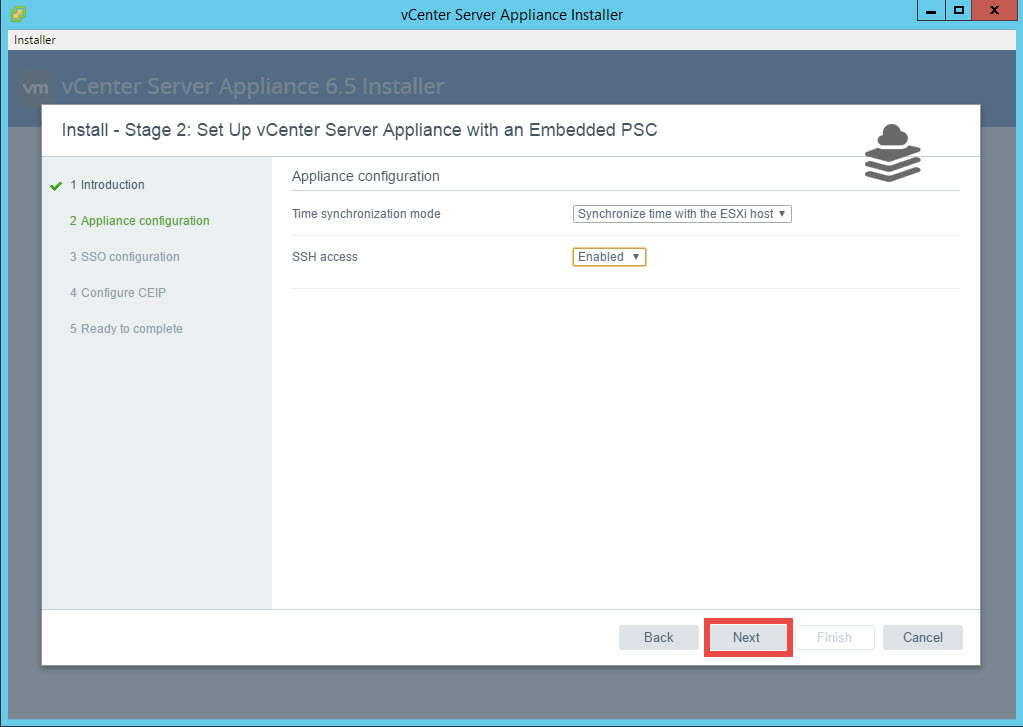
Configure Appliance Time Synchronization. You can synchronize with ESXi host or you can provide the Separate NTP Servers.
You can also Enable or Disable SSH access of the Appliance.
Click Next to proceed.

Step 14:
Configure Single Sign-On(SSO).
Provide the SSO domain name.
Set the Password for the administrator account.
Set the site name.
It is recommended to go with the defaults.
Click Next to proceed.

Step 15:
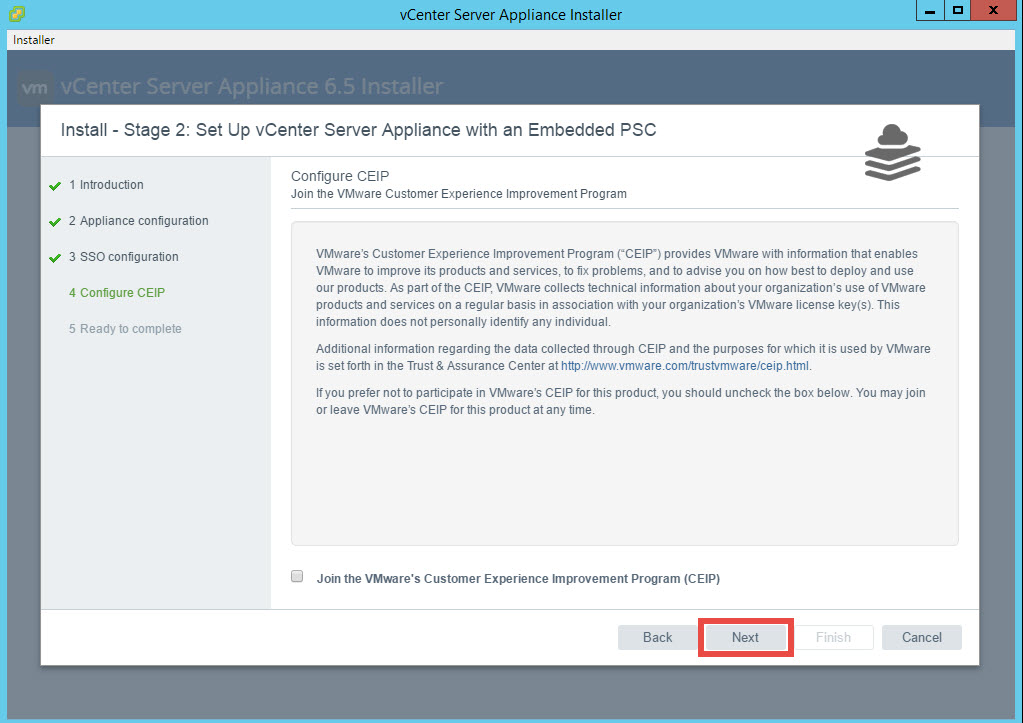
You can join the VMware Customer Experience Program by checking the checkbox or you can click Next to proceed.

Step 16:
Now we are ready to start with the stage 2 installation.
Check & Verify all the configuration before clicking on Finish because after the installation starts you can not make changes to the configuration.
Click Finish to start the Installation of the Stage 2.

Now you can see that installation has begun. It will take 25-30 minutes depending on the environment.

Now you can see that we have successfully deployed the Appliance.
Click Close to close the installer.
You can access the newly deployed the Appliance using vSphere Web client by the IP address or Hostname you have used.
For e.g
https://IP or Hostname:443/vsphere-client/
You can also view the Appliance getting started page by the same.
For e.g
https://IP or Hostname:443
Checkout Our Posts on vSphere 6.5:
How to Install ESXi 6.5 Step by Step ?
How to Install vCenter Server 6.5 Step by Step ?
Checkout Our Posts on vSphere 6.5 Upgrade Series:
How to Upgrade ESXi 6 to ESXi 6.5 Step by Step ?
How to Upgrade VCSA 6 to VCSA 6.5 Step by Step ?
How to Upgrade vCenter Server 6 to vCenter Server 6.5 Step by Step ?
That's it for Today Friends. I Hope you liked reading this post & If you find anything more to be added or removed feel free to write it in our comments. If you find it useful You are Feel free to share this on social media to help others & spread knowledge.
If you have any query on any thing you are free to write it in our comments section & we will make sure to provide you the better solution as soon as possible.
Join Our LinkedIn Group to get Updates & Discussions : Mastering VMware.
Checkout our Facebook Group for discussions & more.
You can also Like & Share our Facebook Page for Latest Updates.
Hi I am Mayur Parmar. Independent Author & Founder of Mastering VMware. I am working in IT industry for more than 4 Years with knowledge of VMware , Microsoft Server's, Linux Server's.
How To Install Vcenter Server Appliance 6.5
Source: https://masteringvmware.com/how-to-install-vcsa-6-5-step-by-step/
Posted by: eldredapocran.blogspot.com

0 Response to "How To Install Vcenter Server Appliance 6.5"
Post a Comment